1993, The Oakwood Press, pbk
In stock, click to buy for £13.83, not including post and packing
Alternative online retailers to try:
Click here to access our prebuilt search for this title on Abebooks
Or click here to access our prebuilt search for this title on Alibris
Or click here to access our prebuilt search for this title on Ebay
Or try Biblio


|
- The Solway Junction Railway [top]
Written by Stuart Edgar and John M. Sinton
First published in 1990 in Great Britain by The Oakwood Press
Reprinted in 1993 in Great Britain by The Oakwood Press
in paperback, 72pp, ISBN 0853613958 . No. 176 in The Oakwood Press Locomotion Papers series . No. 176 in The Oakwood Press Locomotion Papers series
About this book:
Incorporated by Parliament on 30th June, 1864, and authorised to construct a line from the Caledonian Railway near Kirtlebridge to the Brayton Station of the Maryport and Carlisle Railway, it's proposed length was about 25.25 miles and share capital of £320,000
in £10 shares was allocated. It was built to get hematite ore from the mines in Cumberland to the furnaces in Lanarkshire avoiding a long roundabout route via Carlisle.
Construction of the railway officially began on Tuesday 28th March, 1865 with the first sod cut at Annan. A medallion (shown in the book on page 12) was struck to commemorate the event, which seems poignant given that the line no longer exists
James Brunlees was heavily involved in the design and construction of this line - he was a distinguished civil engineer and already had experience of building bridges across the shifting sands of tidal estuaries (the Kent and Leven estuaries in Morecambe). He designed both the viaduct and the Wampool river bridge; with a Mr. A. MacKennon from Brunlees' staff being the resident engineer. The viaduct was built of iron averaging 34 ft deep from rails to the sea bed of the Firth. The remainder was sea embankments. It took 3.5 years to build and nine years until it was officially sanctioned due to land disputes with the Earl of Lonsdale's estate on the south bank and the Crown Commissioners for Scottish land on the north bank
The railway saw its first passengers, albeit a train load of officials including members of the Board of Trade on a trial trip down the line on 3rd July 1869. It was pulled by two Caledonian Railway Locomotives; and it was passed on 1st September 1869 for goods traffic; and for passenger traffic on 8th July, 1870. This was after allowing time for the viaduct to settle on its foundations. There had been a service between Kirtlebridge and Annan from 1st October 1869, which had been advertised in the local press; and the viaduct saw passengers first cross its span on 8th August 1870 travelling from Kirtlebridge to Bowness.
The viaduct suffered from several problems - a severe winter with a severe freeze in 1880/1881 saw the Rivers Eden and Esk freeze in the upper parts of the Firth. By the end of the second week in January 1881, vertical cracks had appeared in two of the bridge piers and a number of braces. When warmer conditions came in, the thaw brought huge blocks of ice (some as large as 27 by 6 yards) moving rapidly between and against the vertical pillars of the bridge causing large sections to fall in on Saturday 29th January 1881. Out of 193 piers, 45 piers and 37 girders had collapsed.
The railway closed in these stages:
-The viaduct was inspected in 1914 and an assessment of the repairs needed was made, but due to WW1, these did not get carried out, only essential maintenance. The next assessment was made in early August 1921 and the size of the bill meant the repairs were never made.
The viaduct was closed after the last train on 31st August 1921 and was then shut forever (as it turned out to be). Messrs Arnott Young & Co. bought the bridge in 1934 and commenced dismantling it for scrap in May 1934
-The section from Kirkbridge Junction to Bowness and the south entrance of the viaduct lay disused from the formation of the LMS in 1923 until sold with the bridge
-The line from Abbey Junction to Brayton was worked by the Maryport and Carlisle section until, when traffic ceased using the line on 14th Feburary 1933. Track was lifted in 1937
-Brayton: the former Caledonian shed and turntable were removed
-On the Scotland side of the Solway Firth (the Northern Section of the Solway Junction Railway), the passenger traffic was withdrawn from 27th April, 1931 with goods trains running twice weekly until the start of World War 2. When an airfield was built, a short portion from Kirtlebridge came back into use. By 1947, track had disappeared for approximately 2 miles North of the Annan goods shed. When the airfield closed, most of the line from Kirtlebridge was lifted
-In 1953, the line from Annan Station's Goods shed down to the junction with the loop leading on to the Glasgow and South Western Railway's line was closed and in January 1955, this was removed along with the loop on the exchange line (with the G&SWR); and the majority of the line down to where the viaduct used to stand
-The exchange loop remained as a siding for a further decade or so
Contents:
1: The Case for the Railway
2. Building the Line
3. The Opening of the Solway Junction Railway
4. Disaster Strikes!
5. Closure and Demolition of the Solway Viaduct
6. The Last Years of the Railway
7. The Locomotives of the Solway Junction Railway
8. the Route Described
Appendix One: Chronology
Appendix Two: Correspondence concerning the Building of the Solway Viaduct
Index
Illustrations in the book:
p3. Extract from the 1870 Bradshaw's Manual, entry No. 346 concerning Solway Junction
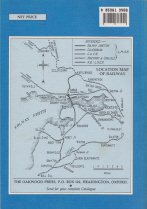
p4. Plan of the Solway Junction Railway and adjoining railways
p6. First page of the 1866 Act authorising the Solway Junction Railway Company to raise further operating capital
p9. Invitation to the cutting of the first sod
p11. The ballad specially written to celebrate the events of 28th March, 1865 - 'Come, come! stout men of Annandale...'
p12. Two photographs showing both side of the commemorative medal
p14. Diagram showing the structural elements of the viaduct with measurements (in feet and inches) as originally recorded in The Engineer magazine
p15. Two photographs of the viaduct as photographed in 1881 showing useful constructional details for the railway modeller and historian
p17. Drawing showing the greater part of the line as shown in the RCH Junction Diagram book of 1920
p18. Reproduction of the first timetable reproduced from the original (poor quality)
p20.
Reproduction of the first page of the authorisation for the Caledonian Railway to purchase part of the Solway Junction Railway in 1873
p22. The first page fo the Act authorising the Caledonia Railway to purchase the whole of the Solway Junction Railway
p23. Photograph (undated, but from the 1930s) of the 10.47 am service from Kirtlebridge seen arriving at Annan (Shawhill) with CR 4-4-0T No. 15027 in charge of the one coach service
p24.
LMS timetable for the Solway Junction Railway for July 1923
p26. Two photographs (black and white) showing the extent of the damage to the viaduct caused by the ice during January 1881 - whole sections of the viaduct are missing as well as cross-ties missing between the legs and sometimes the legs themselves...
p27. Two photographs (black and white) showing how the ice has twisted the metalwork on the viaduct and showing the gap where the west-side rail hangs in midair, its fishplates useless but still in place
p29. Poor quality, grainy photo showing two cranes in the distance poised on either side of the gap in the viaduct assisting in the repair work
p30.
Outline drawings (looks like to scale, but scale & measurements are not given) of Kirtlebridge's signal box which controlled the junction with the Solway Junction Railway
p31. Section of the 1901 25" Ordnance Survey Map showing Kirtlebridge Station, Rae's Cottage, the Irving Arms Hotel, a tramway, two quarries and Galls
p32. The locomotive shed at Kirtlebridge dated to June 1936. The signalbox from page 30 is in the rear of the photograph
p32. A photograph of Kirtlebridge Station with the signalbox nearest the camera
p33. Photo of the front Caledonian 4-4-0T No. 15027 with one carriage at Annan (Shawhill) in the 1930s. Station advertisements show Bovril and Monkey Brand signs
p33. Photo of Annan (Shawhill) station looking north
with a grounded coach body on the left and milk churns awaiting collection next to the Stationmaster (?)
p34.
Section of the 1901 25" Ordnance Survey Map showing Annan Station, Solway Cottage, St. Columba's R.C. Chapel, the Smithy and the Goods Shed, also a pump and part of Hecklegirth
p35. Photograph (b&w) of a mixed train leaving Annan (Shawhill) on the last day of passenger service with London Midland Scottish Railway (LMS)
engine No. 14463 (4-4-0) at the head
p35. Photograph (b&w) of Annan (Shawhill) looking South showing a CR 4-4-0T on a Kirtlebridge to Annan train (1930s)
p36.
Section of the 1901 25" Ordnance Survey Map showing the connecting loop from the Solway Junction Railway to the Glasgow and South Western Railway at Annan. Shows Annerley; The Glint; and Frithbie
p37. B&W photo of LMS (ex-CR) 4-4-0 No. 14454 pulling
an empty stock, cattle and sheep special standing on the connection between Shawhill Junction and the G&SW junction
p37. Good quality b&w scan of an early postcard that shows the Solway Junction viaduct from the Annan Side
p38. B&W photo of the view northwards over the viaduct from Bowness station overbridge, taken in 1929. The overgrown state of the track can be clearly seen with shrubs encroaching from the bank facing West towards the Firth. The lower photograph shows the overbridge and Bowness station looking South
p39. Good quality reproduction image (b&w) of a postcard showing the viaduct and entitled 'Evening on the Solway, Bowness on Solway'. The length of the construction is quite stunning in this view. The lower photo shows close-up the decking of the viaduct and how the rail was fixed on
to it
p40. Section of the 1901 25" Ordnance Survey Map showing Bowness Station, the signal box, cattle pen and pump
p40. Photograph of the viaduct in the distance with three children playing on the sands
in the foreground
p41. Bowness station looking north in 1929
p41. Bowness station looking south; photographed in 1913 with locals and station staff posing for the occasion. Contrasts strongly with the lonely, neglected and forelorn image of the station in the photograph at the top of the page
p42. Clear, good quality black & white photograph showing a side view of the rail bridge over the River Wampool
(between Whitrigg and Kirkbridge Junction), taken in 1930
p42. Bowness station buildings photographed in b&w in 1988 (now someone's home)
p43. Section of the 1901 25" Ordnance Survey Map showing a) Wampool viaduct and b) Whitrigg Station
p43. B&W photograph of Whitrigg Station looking much abandoned and neglected
p44. Section of the 1901 25" Ordnance Survey Map showing Kirkbride Junction, signal box
p45. B&W photograph of Kirkbride Junction, looking south in 1929
p45.
B&W showing the small building that remains of Abbey Junction station in May 1988
p46. Section of the 1901 25" Ordnance Survey Map showing Abbey Junction and Station, signal box and footbridge
p47. Photo (b&w) of LMS (ex-LNWR) 0-6-0 No. 8414 preparing to return to Maryport at Abbey Station Junction
p47. Abbey Junction photographed from the North British Railway Line looking North. The Solway Junction line is coming in on the right from Bromfield and Brayton. The station and waggons standing in its sidings can be seen in the near distance
p48. Section of the 1901 25" Ordnance Survey Map showing Bromfield Station, Bromfield Hall, cattle pens, crane, Langrigg Bridge and Bank House
p49. Photograph of a very neat looking Bromfield Station building in bright sunshine
p49. B&W photo of Manchester South Junction with Altrincham Joint Railway coaches standing in the Brayton sidings
p51. Brayton Junction, b&w photo, showing the Solway Junction
curving off to the left and the signalbox on the left of the picture, on what looks to be a lovely sunny day. The main Maryport to Carlisle line runs to the right
p51. Section of the 1901 25" Ordnance Survey Map showing Brayton Station, Brayton Domain Colliery, Station Wood, and Carr Wood and Reservoir
p54. Miss Bury and friend standing on the viaduct (the stub of it) in 1931
p54. Reverend Bury and Miss Bury standing on the end of the embankment at Bowness after demolition of the viaduct
p57. Extract from Bradshaw's Timetable of 1931 stating that the Kirtlebridge to Annan railway service had been discontinued
p58. Reproduction of the North British Railway Company notice of closure for Bowness, Abbey Junction, Whitrigg, Bromfield and Brayton stations. Rosslynlee Station (North British) was closed by the same notice
p59. North British Railway Company - Circular No. G3583 - closure notice of 31st August 1921, for the Solway Branch of the Caledonian Railway
stamped by J.M. Stevenson and issued by John C. Christie, Chief Goods Manager
p60. Two b&w photos showing side views of:
i. CR 0-6-0 No. 542 (Solway Jncn Rwy) as built
ii. CR 0-4-2 WT No. 1 (CR No. 540; Solway Jncn Rwy) as built
p62. Two b&w photos showing side views of:
i. CR 0-4-2 No. 1323 (originally Solway Jncn Rwy No. 4)
ii. CR 0-4-2 Nos. 452 and 453 (originally Solway Jncn Rwy), as built
p64. Two b&w photos showing side views of:
i. CR 0-4-2WT No. 540A (originally Solway Jncn Rwy) as finally running with driver on the footplate
ii. CR 0-6-0ST No. 539
p66. Table 1, showing the locomotives of the Solway Junction Railway summarising information on running number, maker, date, type, maker's number, renumbered to and withdrawn date
p68. Table 2, showing Point to Point distances between the stations of the SJR
p68. Diagram showing the detail of the Solway Viaduct
p71. B&W photo of Abbey Junction looking north |
Caledonian Railway
London, Midland, Scottish Railways
Railway Walks in the North
North British Engines
|